Getting Started with Propagation Prediction
Forecasting Propagation from a DX Station to Your Station
To forecast propagation from a DX station to your station,
on the Configuration window's Prediction tab, set the Forecasting Engine panel to VOACAP SNR & Prob
on the Configuration window's General tab, set the Distance Units panel to Miles or Kilometers, depending on how you'd prefer to see distances displayed
on PropView's Main window, select the Parameters tab
set the Prediction Direction panel to From the DX Station
set the Prediction Path panel to Short
in the Conditions panel
set the forecast Date (double-click for the current UTC date)
click the U button to the right of the SSN to update the Smoothed Sunspot Number
click the U button to the right of the K-index to update the Geomagnetic K Index
set the Avail to 50
set the Mode selector to the mode you'll be using, e.g. CW, SSB, RTTY, or PSK31; this will set the Required SNR (in the box labeled SNR) based on the settings in the Mode-dependent Settings panel on the Configuration window's Prediction tab
in the Your Station panel
if DXView has not been installed and configured, type your QTH's latitude and longitude into the Lat and Lon textboxes respectively, using ddd mm' ss" D notation, e.g. 43 25' 32" N; alternatively, enter your QTH's grid square, and strike the Enter key. If DXView has been installed and configured, your QTH's latitude and longitude will be set from the Latitude and Longitude specified in the QTH panel on the General tab of DXView's Configuration window.
a in the Man-made noise level panel, choose the setting appropriate to your QTH
in the DX Station panel
if you're running DXView, type the DX station's callsign or DXCC entity prefix into its Main windows callsign box and strike the Enter key, or click a location on its world map. If you're not running DXView, type the DX location's latitude and longitude into the Lat and Lon textboxes respectively (e.g. 40 15' S and 150 12' E); alternatively, specify the DX station's grid square and strike the Enter key.
set the Power panel to the DX station's estimated RF output power
click the Predict button; PropView will compute a forecast, and produce a graphical display on the Main window's Prediction tab
Interpreting the Forecast
After generating a prediction, uncheck the Prediction tab's Plot Critical Frequencies box and check its Show Open Bands and Show Current Time boxes.
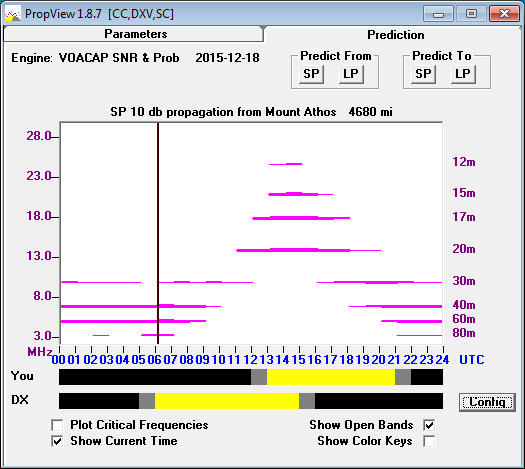
The forecast is a graph of frequency on the vertical axis vs. UTC time on the horizontal axis. Frequencies are labeled in megahertz along the left side of the forecast, and in meters along the right side.
Band openings are depicted as horizontal magenta lines; the thicker the horizontal line at a particular frequency at a particular time, the higher the probability that there will be an opening on that frequency at that time. The black vertical time line depicts the current UTC time, so its intersections with the horizontal magenta lines identify current band openings:

You can use your mouse to drag the time line to the left or right to make it easier to see exactly when openings strengthen or weaken. Doing so will uncheck the Show Current Time box; checking this box will return the time line to depicting the current time.
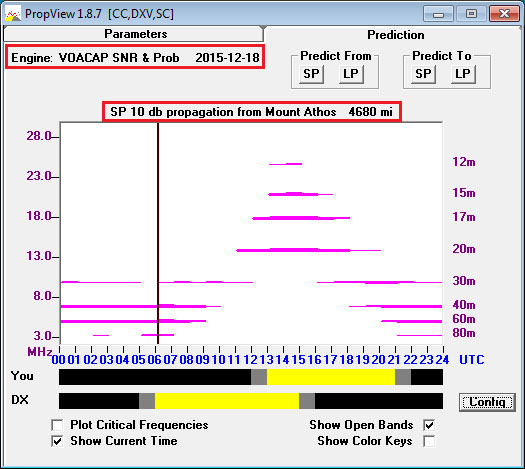
Text in the Prediction window's upper left corner identifies the engine used to generate the forecast, and the UTC date for which the forecast was generated:

As is highlighted in the screen shot above, text immediately above the the forecast graph specifies
Short path SP or long path LP
the Required SNR for which the forecast was generated (as specified in the Conditions panel's SNR box)
whether the forecast is for signals from the DX Station, or for signals to the DX Station
- the location of the DX Station
- the distance from your station to the DX Station in miles or kilometers
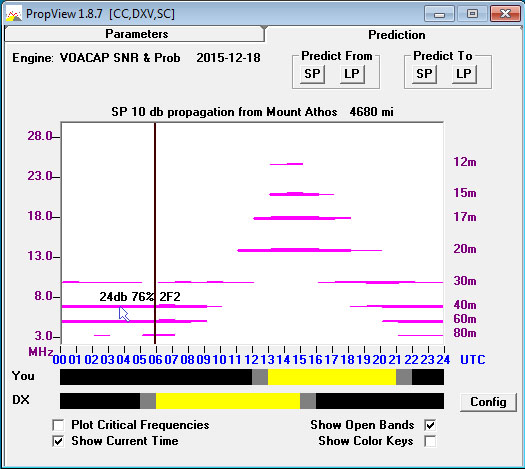
To assess the strength and probability of an opening at a particular frequency and time, allow the mouse cursor to hover over the horizontal magenta line at that point; three values will appear:
- the estimated signal strength, in decibels
the percentage of days in the current month during which the estimated signal strength will exceed the Required SNR specified in the SNR box in the Conditions panel on the Main window' Parameters tab (and in the text immediately above the forecast graph)
the Propagation Mode, expressed as "hops" between ionospheric layers
In this forecast, placing the cursor on the 40m opening at 0400Z shows the estimated SNR at 24 db, with 76% of the month's days exceeding the specified 10 db minimum SNR:

The 2F2 shown above means that propagation involves two F2 layer hops.
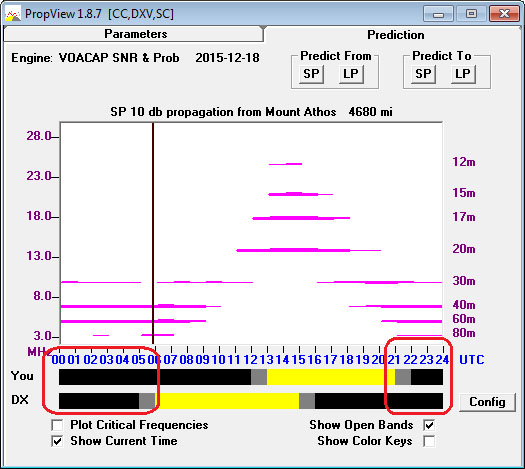
Below the forecast graph's labeled time axis, two multicolored horizontal bars labelled You and DX show daytime (yellow), twilight (gray), and nightime (black) conditions at your QTH and the DX Station's location respectively. For the low bands -- 160m, 80m, 60m, and 40m -- twilight or dark conditions at both your QTH and the DX location are generally required; the intervals of common darkness are red-circled in this screen shot:

Variations
You can immediately generate a long path forecast by clicking the Predict From panel's LP button; this panel is located in the Prediction panel's upper-right corner.
Before predicting the strength of your signal at the DX Station's location, return to the Main window's Parameters tab and
set the Prediction Direction to To the DX Station
in the Your Station panel, set the Takeoff to 3 and set the Power to your station's RF output power, in watts
in the DX Station panel, set the Man-made noise level to reflect the likely conditions
Now you can select the Main window's Prediction panel and generate short path or long path forecasts for your signal strength by clicking the Predict To panel's SP or LP buttons respectively.
Predicting Propagation with Active DX Stations
Troubleshooting
If after you initiate a forecast, the Prediction tab of PropView's Main window displays ...computing but never produces the requested forecast, enable short filenames in Windows.
