Interoperating with an S.A.T. (Self-contained Antenna Tracker)
Note: the functionality described in this article requires Commander 15.5.0 (or later), DXKeeper 15.1.5 (or later), and SpotCollector 8.4.4 (or later)
Commander can be configured to interoperate with the S.A.T. Self-contained Antenna Tracker. In this form of interoperation, S.A.T. directly and exclusively controls your transceiver; Commander
interacts with your S.A.T. to track your transceiver's uplink frequency, downlink frequency, and mode, making these available to other applications just as it does when directly controlling a transceiver
obtains the current satellite name from your S.A.T., and makes this available to other applications
to satisfy LoTW, AO-07 is reported to other applications as AO-7, and ISS is reported to other applications as ARISS
computes the satellite mode from the uplink frequency and downlink frequency, and makes this available to other applications
Configuring S.A.T.
Configuring Commander
on the Configuration window's General tab, set the Radio panel's Model selector to S.A.T.
on the Configuration window's General tab,
type the the IP address of your S.A.T. into the IP Address text box
type the IP Port of your S.A.T. into the IP Port text box; note that this value defaults to 12080
an S.A.T. panel will appear in the upper-right corner of Commander's Main window showing
- connection status
if Commander is not connected to S.A.T., a Connect button
if Commander is connected to S.A.T., the name and mode of the satellite selected in S.A.T.
Commander panels and buttons not used when interoperating with S.A.T. will be hidden or disabled
on the Configuration window's Ports tab, clear the Primary CAT Serial Port panel's Port# selector by selecting the blank entry at the top of the list of entries
if your S.A.T. is not already running
start your S.A.T.
after your S.A.T. is running, click the Connect button in Commander's S.A.T. panel
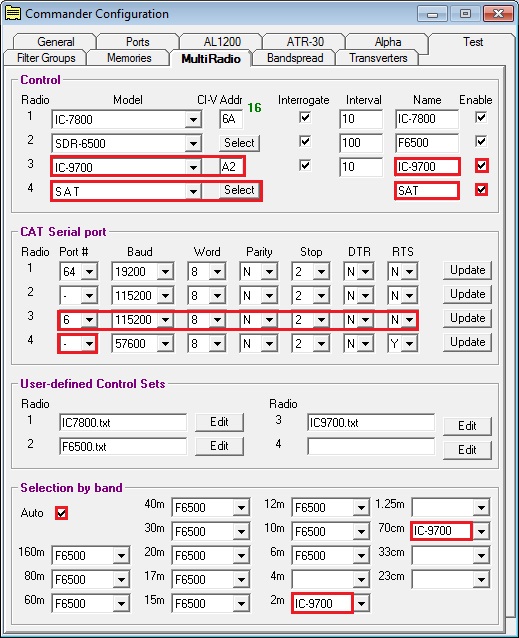
to facilitate rapid switching between the arrangement in which your S.A.T. controls your transceiver and the arrangement in which Commander directly controls your transceiver, setup two radio definitions on the Configuration window's MultiRadio tab:
Configured as shown in the above screen shot, Commander will enable you to switch between interoperation with your S.A.T. and direct control of your transceiver with a single mouse click in the Main window's left-hand VFO panel.
In theControl panel,
set a Model selector to S.A.T.
set the Name textbox to the far right of that Model selector to your choice of name; in the screen shot above, SAT is specified
click the Select button to the immediate right of that Model selector; in the Multi-transceiver Connectivity Selection window that appears,
specify the IP Address of your S.A.T.
specify the IP Port of your S.A.T. (default is 12080)
close the Multi-transceiver Connectivity Selection window
in the CAT Serial Port panel, set the Port # for S.A.T. to - (the value in the selector just below COM64)
Note the use of Selection by band to automatically select the transceiver (an IC-9700 in this example) when a 2m or 70cm frequency is selected.
Logging
If Commander is running and connected to your S.A.T., typing a callsign into the Capture window's call box and striking the Enter key will populate these Capture window items:
Item
Contents from S.A.T.
tx freq
uplink frequency
rx freq
downlink frequency
mode
transceiver mode
sat name
satellite name
sat mode
satellite mode
If DXKeeper's Optimize for realtime QSO entry option is enabled, fields on the Main window's Log QSOs tab will be similarly populated when a callsign is typed into the QSO panel's call box and the Enter key is struck.
Spotting
If Commander is running and connected to your S.A.T. with SpotCollector's Spot xcvr split option enabled, the Notes box in the Outgoing spots panel at the top of SpotCollector's Main window will be populated with the active satellite' name followed by the word uplink and the current uplink frequency; additional information cannot be added to the Notes box.
Post a question or suggestion on the DXLab Discussion Group

